


Mini Plaid-ish Quiltalong - Assembling Your Quilt Top
We did it — we made it to the final week of the quiltalong. This week we will be assembling our quilt top and I will also give you some information about finishing your quilt (fabric requirements for backing and binding are included below).
One of my least favorite parts of quilting is sewing long seams, so when I assemble my quilt tops, I usually make them into 4 quandrants and then I sew those together. You can piece your quilt top together however you like, but this way will only give you one long seam.
Sew the blocks into four pieces (imagine you are making 4 little quilts).

Then sew the top two together and the bottom two together.

And then sew that single long seam.

If you are pressing your seams to the side, press toward the C Blocks and your seams will nest. Your quilt top should end up at 50" x 64".
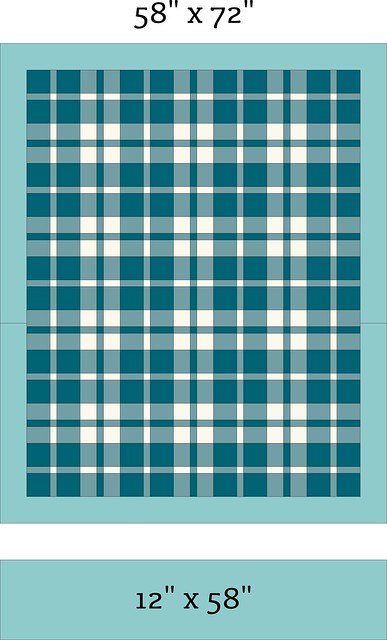
Backing
For this quilt, you will need at least 3 1/4 yards of fabric if you are using regular 42"-44" wide fabric.

First, cut the fabric in half so that you have two pieces that are about 58" wide by width of fabric (WOF). You can cut your selvages off at this point if you would like, but I normally leave mine attached.
Sew the two pieces together along the 58" edge. Press your seam and trim your selvage if it is still attached. I like to use a 1/2" seam allowance for this step.

Now trim off your extra length — it should be about 12". This will vary a little bit depending on how wide your fabric was and the seam allowance that you used.
For my quilt, I am going to be using a minky fabric. Most minky fabrics are around 60" wide so they are perfect for a quilt top that is this size and you only need 2 yards! I do not like to piece together minky for a quilt backing because it is stretchy and very messy, so I use 90" wide minky for larger quilt sizes.

There are tons of super cute colors and prints that are available for 60" wide minky that aren't available for 90" wide, so I am excited to get to use one on this quilt. If you are looking for a resource for purchasing minky, I have had good luck with Feather Your Nest and CaliQuiltCo on Etsy.
Tip: Don't cut the selvage off of your minky until you are done quilting — it will save you a ton of mess! It is also useful to put the minky in the dryer on low heat for just a couple of minutes. It will reduce a lot of the fluff.
Binding
For your binding fabric, cut (6) WOF strips. You will need 1/2 yard of fabric if you are cutting your fabric strips 2.5" wide or thinner (you could possibly get away with a little less than 1/2 yard). I like to cut my strips 3" wide and 1/2 yard would be a tight squeeze, so I will make sure I have a little bit more than 1/2 yard.
Tip: if you are using a luxe minky for your backing like I am and you plan to hand sew your binding to your quilt, I highly recommend machine stitching your binding to the back of the quilt and then hand sewing it to the front of the quilt. This would be the opposite of what is normally done. You can see an example of that in this post.
I think that's it! I am going to be sharing photos of finished quilts and quilt tops from the quiltingalong in my stories as I see them. I am hoping to share a photo from everyone who participated and finished their quilt — if I happen to miss yours, please send me a message! I promise, it wasn't intentional.
Janet on
Rebecca on
I finished my top and am very happy. Are you going to suggest how to quilt the mini-plaidish? I’ve been looking at lots of long-arm patterns, but have no idea how to pick one that will look nice with the top. Thanks!
KL on
I am guessing that the mini Plaidish has smaller squares than the Plaidish. I can’t find the dimensions and just cut one swath of 5" squares, so probably ruined it already. Where are the correct measurements??? Thanks and I need this pretty quickly